November 7, 2012

Facebook Photoshop CS6 cover template


Facebook Photoshop CS6 cover template.
All Layers are named in a way that you can modify it easily. Click here to download the PSD file to make you own Photoshop CS6 cover.


The PSD contains layers as shown below.

  • Remove the brush strokes if you wish to add your own.
  • 'your image here' Layer is where you should add you image. 
  • Make sure it is transparent or erase the unnecessary parts so the Transparent Layer will be visible.


Feel free to drop a comment if you have any issue.

November 2, 2012

How to make your own facebook 3D Cover layout using photoshop

Hi everyone,

I received a lot of emails regarding how to make the facebook 3D layout. Due to the numbers of requests and views of my facebook 3D layout post I decided to teach you how to do it for those who are interested. I used Photoshop CS6 as you may see but you don't have to worry about it you can do it with what ever photoshop version you have. :)

Personally I neither do like to read nor write too much. So i have made it simple as possible for you to understand the steps. Feel free to leave a comment. Lets get started.

Step 1 - print screen and paste to photoshop using clipboard size document

  • Open your browser and brows you facebook profile and get a print screen.
  • Now open photoshop and create a new document (ctrl + n) and use the clipboard size for the document.
  • Now paste it into the blank document.

Step 2 - Guidelines around the cover

  • Zoom into the image and add guidelines around the cover. (Hint)


Step 3  - Fix friends and message button

  • Go back to the browser and in your profile select 'view as' and type a friends name as shown below. (you'll understand later why you have to do this I'll not explain here why just to save your time)

  • Now get a print screen and paste it on your psd over the previous layer.
  • move it up and down accordingly to fix the cover to your guidelines (if necessary).
  • your layers should look like this now.
  • 'layer 2' is the new image which I pasted last and it's currently selected.

  • Make a selection using the marquee tool as show below

  • With the 'layer 2' click 'add Layer Mask' in the bottom of layers panel as shown below.
  • Now select 'layer 1' & 'layer 2' and merge them together (ctrl + e)
  • also make sure the final result look like this.


Step 4 - Guidelines around profile picture and remove sponsor ads
  • Now add guild lines around your profile picture like you did before for you cover.

  • select the sponsors ads and other links in the right side of your cover using the marquee tool and fill it with the light blue color in the background. (use the color picker too <shortcut 'i'> and paint bucket tool <shortcut 'g'>
  • make sure you did the changes to the current layer. If you made a new layer you should merge it with the previous.


Step 5 - Mask the cover area deselecting the profile picture
  • Using the marquee tool select the cover area.

  •  now select the profile picture area while holding down the 'alt' key to subtract from the current selection
  • click 'add layer mask' and the result should look as in below

Step 6 - The 3D Effect
  • Duplicate the current layer.
  • now select and transform the below layer (make sure the shift key is always down when transforming)  <shortcut ctrl+t>
  • resize and place your layer as desired.
  • duplicate the bottom layer and keep continuing as long as you are satisfied.
  • I stopped right here
Step 6
  • Now add any background layer layer and make sure it's at the bottom of the layers as shown below (left side).
  • you can use the same image which you currently have on facebook just by disabling the last layer's mask. (you can right click on the last layer and select 'disable layer mask)
Step 7 - Save cover
  • using the 'slice' tool draw a slice around the cover or crop it down so only the cover area will remain.

  • click file > save for web...  save it with the maximum quality.
You are done :)

Leave a comment if you didn't get anything so I can explain. Feel free to leave a comment if you want to showoff your cover to other viewers :D

Click here to view the 3D layout which i did long time before.

October 9, 2010

How to sketch a photo in Photoshop

I know many of them like to sketch your photo, but because you don't know how to do it you must have searched for a site who does it free for you. But did you realize that it drops the quality of your image?
If you know how easy it is to sketch a photo in Photoshop I'm sure you'll not wast your time searching for a site to sketch your photo any more. Even some of you sure don't like to take a risk by uploading your picture to site that aren't trust worthy at all and get it sketched cause God knows what they do with your photo saved in their server. O.K. i don't like to talk too much. So lets get started.
Note:
  • Click here if you need to get the image I used for this tutorial
  • Click here if you need the Sketch of this image
  • Click here if you like to do it with 'one-click'  using the Photoshop Action file
  • And please don't forget to leave a comment if you like it.

Step 1
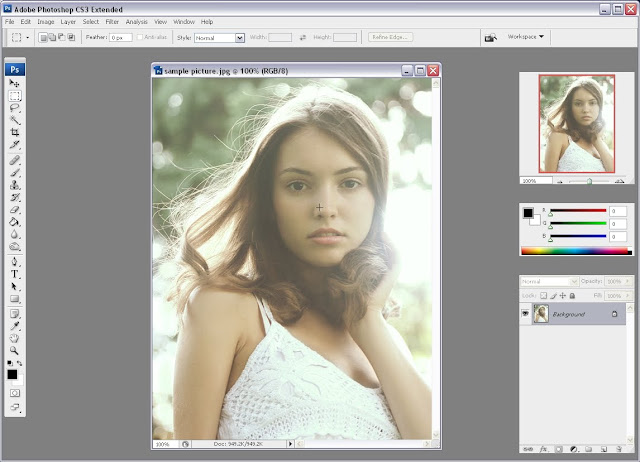
  • Open the picture which you want to sketch.


Step 2
  • Right-click the Background Layer and select 'Duplicate' (Ctrl+J)


Step 3
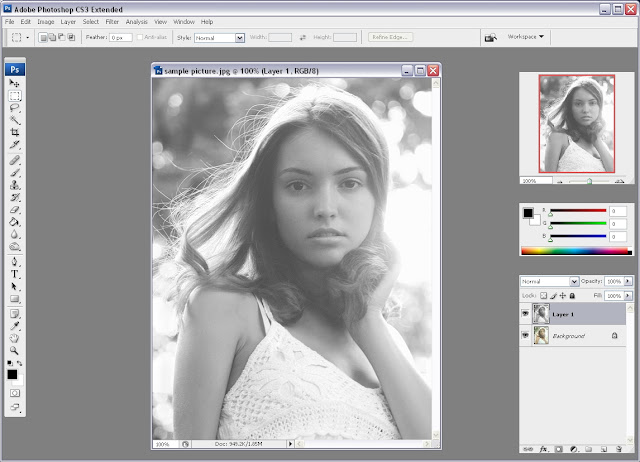
  • Desaturate the layer (Shift + Ctrl + U)


Step 4
  • Duplicate Layer 1 (Select Layer 1 > Ctrl + J)


Step 5
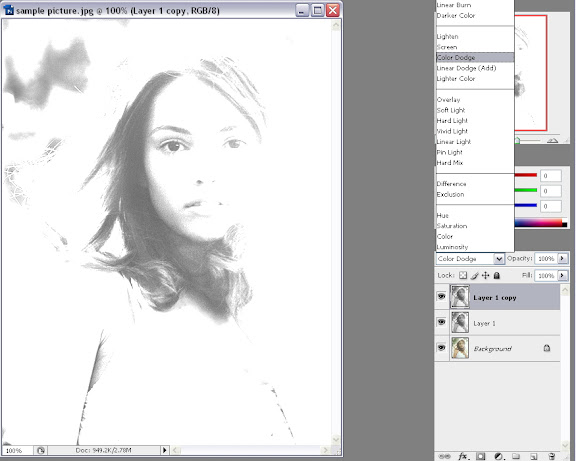
  • Select Layer 1 copy > Under the blending mode select Color Dodge as shown bellow


Step 6
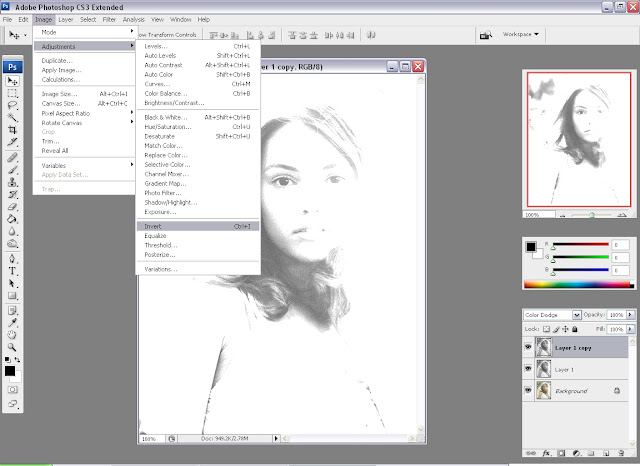
Invert the Layer 1 copy (Crtl+I)
  • Select the layer > on the menu bar select; Image> Adjustments > Click Invert 


Step 7
  • Select the top layer(Layer 1 copy)  in the menu bar select; Filter > Blur > Gaussian Blur...
  • Selected a radius at about 3, 4 pixels & click OK


Step 8
  • If your happy with the result go ahead and save it. If you want you can do another small adjustment to make it look better.
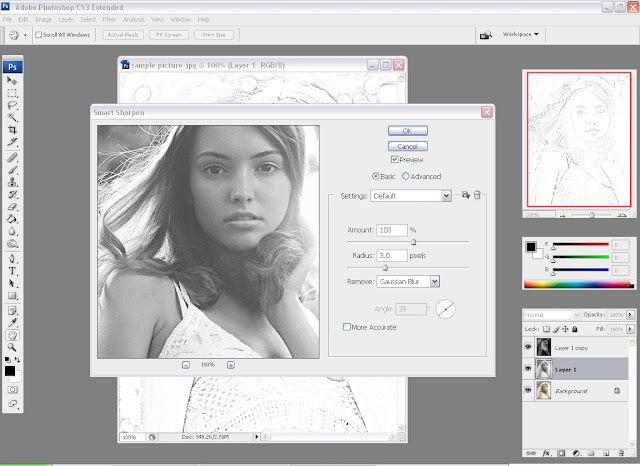
  • Select the second layer(Layer 1)  in the menu bar select; Filter >  Sharpen > Smart Sharpen...
  • Amount - 100%
  • Radius - 3 pixels


Step 9
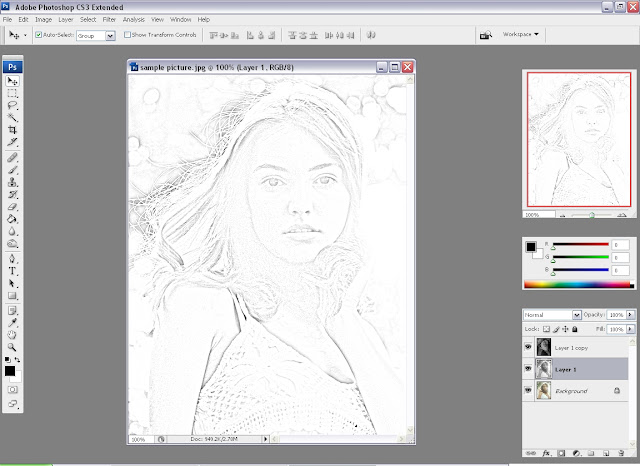
  • Your done. Here's the result...